- Szczegóły
This template comes loaded with options that you can use to customize your site exactly how you want it. Here's how to get to these custom settings:
- In the backend of Joomla go menu item Extensions/Template Manager.
- Click on the title of the template.
- This will bring you to the template manager screen where you can edit the template's parameters.
- Click save when you are done

- Szczegóły
Every template built on Vertex also comes with its own unique template specific options applicable to that particular template such as highlight colors, social icons, and much more. These features are in addition to the standard functions of Vertex, and are still controlled through the very user friendly interface of Vertex. This page will document the features specific to this template.
Template Specific Configuration Interface of Vertex
Below is a screenshot that shows all the template specific features available in the user friendly Vertex admin:
Custom Highlight Colors
Set your own custom color scheme with the built in highlight colors. There are two built in highlight colors that control menu items, titles, buttons, hover over effects, and much more. You can set these colors to any color that you want.
Top Row1 Inset Shadow
The top_row1 area of this template was designed to have a background image, which is controlled under the Backgrounds tab of Vertex. In addition to that background you set an inset shadow to cover the background image. You can set the size and opacity of this shadow to any size you wish.Social Icons
Easily link to a social media site with the built in social icons found in the header of this template. Simply enter the url of your social site in the configuration and the icon will automatically appear. To disable an icon simply leave the url blank for that particular icon.
Uppercase Leters
Choose to enable or disable uppercase letters on most menu items, buttons, titles and more.

Small Menu
The S5 Flex Menu gives you the ability to have subtext on each menu item. If you choose not to use subtext on the first level links simply choose to disable this option and the menu will automatically down size.

Custom Header Background
At the bottom of the Template Specific tab you will see a separate section dedicated to custom header background options. These options allow you to specify the color or background image of the header. In the image below the header is shown with a repeating static background image. The default background is white, but you can override this with your own background settings as needed. Be sure to read the titles and tooltips of each feature to see what each does.
- Szczegóły
- Szczegóły
So what are Site Shapers? They are quick installs of Joomla combined with all the modules, content, etc used on our demo, excluding stock photography. Within a few minutes you can have your site up, running and looking just like our demo. No more importing SQL dumps and installing modules. Just head on over to the download section of this template and grab a Site Shaper. Simply install the Site Shaper like any other Joomla installation, it's that easy!
How to setup a Site Shaper
- Login to your cpanel or your server admin panel.
- Locate the area where your databases are (usually labeled Mysql Databases)
- Create a new database
- Next create a new database user and assign it to this newly created database in the previous step
- You will then need to extract the site shaper to either a folder on your server or the root directory such as WWW. NOTE: if you already have a website in the root of your WWW folder, we suggest creating a new folder and extract the site shaper there. If your cpanel does not have an extract option or you cannot find it, you may also extract the contents of your site shaper in to a folder on your desktop and upload all the files via an ftp client to your server.
- Next, navigate to the url where you extracted the site shaper via your web browser.
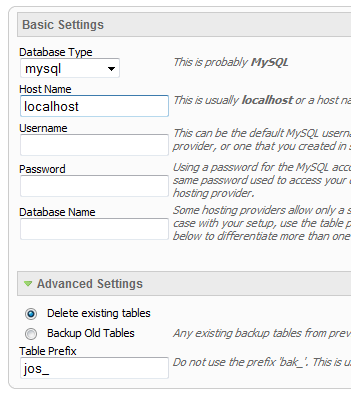
- Continue through each screen until you reach the below screenshot:
- At the above screen be sure to enter localhost as shown, continue to fill in the following text fields with your newly created database and username information
- Follow through the rest of the site shaper setup and click the install sample data at the last screen and the installation is complete! (be sure to rename/remove the installation directory after finishing the install)


